Showing posts with label Basement. Show all posts

11.15.2016

A New Mudroom

You may remember that one of the things our house never had was a true mudroom. There are several spaces that sort of act like a mudroom, but none of them were really achieving what we needed with two kids in school and multiple sports each. The lacrosse gear alone may kill me.

This space was the closest we had to a mudroom. Our side entry is directly off our driveway and our main family/friends entrance and exit. If you know us, you use the side door. Generally you walk in without knocking or a quick knock and a "HELLO?!". That's the way we are. This area was an obvious spot for a row of hook and a boot tray.


Thanks to my blog I know that this has been working for us for nearly 6 years. But the backpacks, shoes and coats are bigger and more plentiful so now we had to make a new choice.

We decided that our basement was the best choice. The stairs you see on the left in the picture above lead to our basement. It's only a half-flight down (about 8 stairs) so it's not a long trek, but it was enough that gave me pause to think about it. I also wasn't sure I wanted the mess in my basement especially since it's mostly carpeted (there's a small tire area at the bottom of the stairs). So, we went with this space which previously held a rarely used desk.


I started pinning ideas I liked and it was pretty clear that I liked white divided built-ins with a wood seat. I thought about doing a column of bins on the side for easy access but ultimately decided that wider cubbies would be a better option. I'm so glad we did that - swim backpacks are huge!

We went with a bead board back to match the built-ins across the room (only about 8' feet away!).


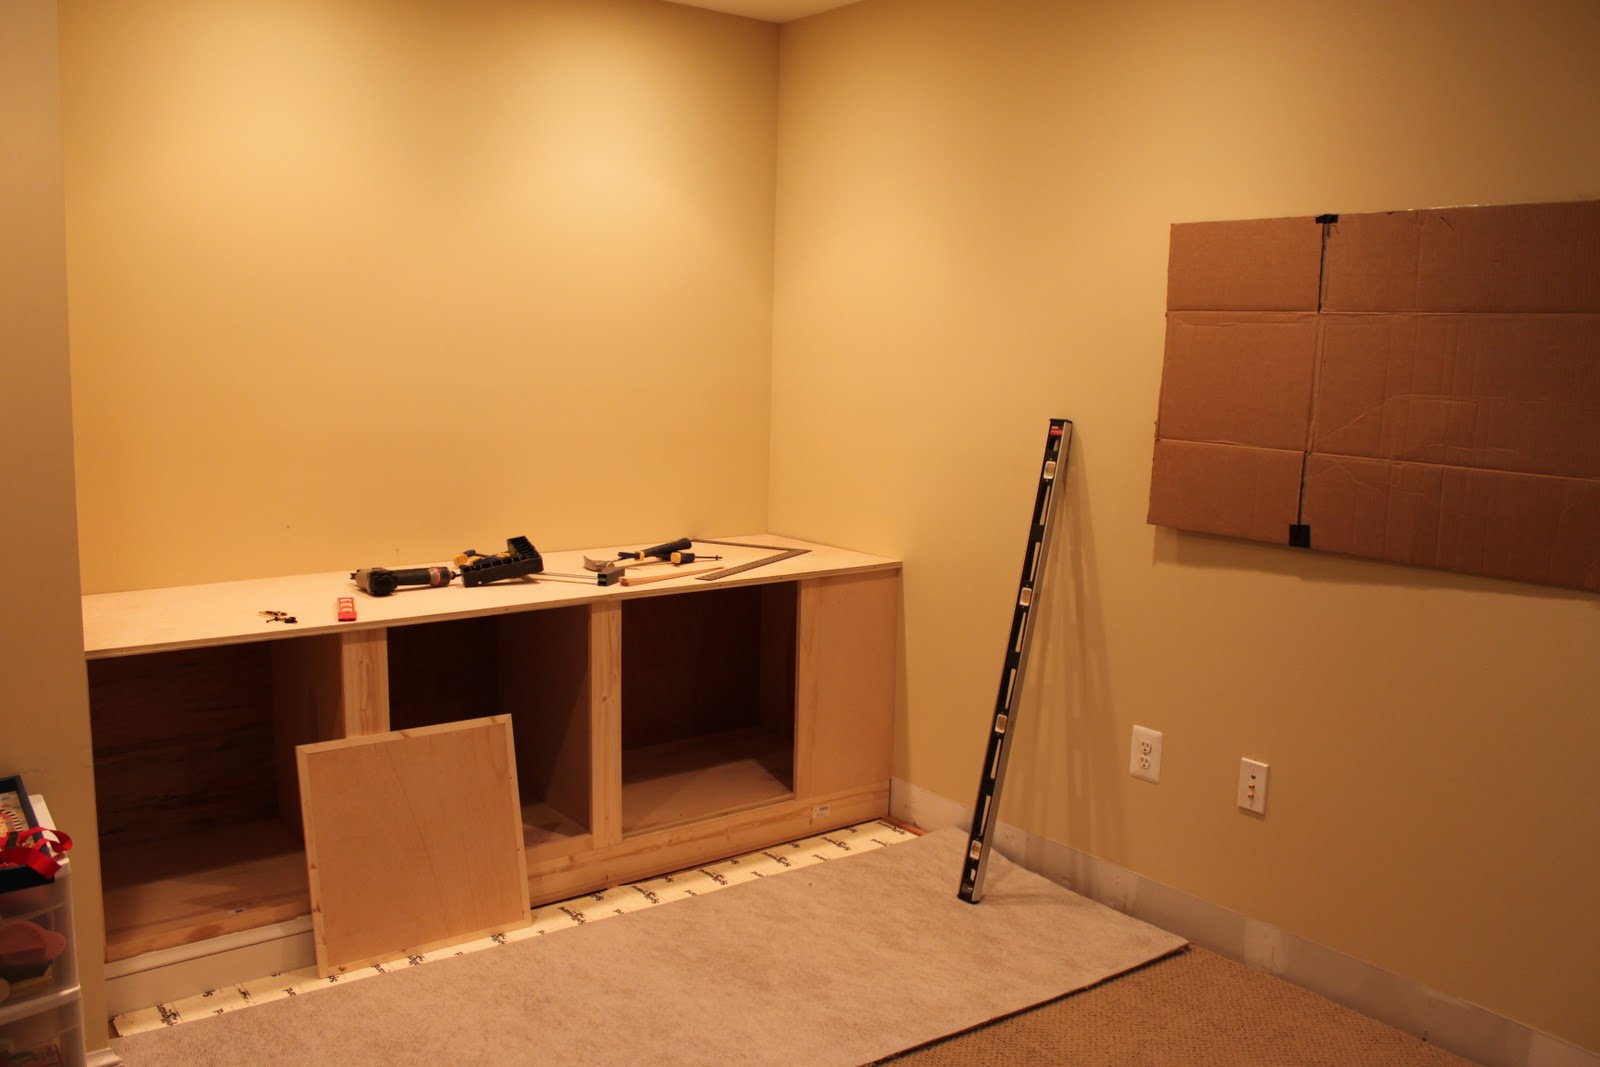
As you can see we pulled the carpet back so the built-ins would sit on the floor. We know that we will someday rip this carpet out so we are preparing for that day. I'm in love with the new wood-look linoleum! If you are worried about reattaching the carpet, it's not hard. You have to rent a "kicker" at a tool rental shop and knee it back in place. It took Jim about an hour to finish that up including the 2 minute drive to and from the rental place! 

We called in the painter to paint everything out. Jim stained the bench top before installing the top but the painter did a couple of coats of polyurethane for us. 


One hurdle was the intake vent on the lower left hand side. We solved that by removing the cover and cutting out the grooves of the wood. We have several intakes for the HVAC so it's not an issue if this one is getting slightly less air than previously. 

And here's the final! 


It took a little while but I found baskets that fit the upper space perfectly. The plastic bins at the tippy top hold extra hats, scarves and gloves that we don't use often or are for a special purpose like skiing! 


The area on the left has tile so we added a few hooks for especially wet things like snow pants and rain coats. Wet boots can stay in this area. We also added a not-so-beautiful plastic runner. It serves the purpose of keeping the carpet dry and relatively clean. We can pull it up and hose it off if we need to but it has nubs on the back that keep it from moving. More functional than pretty but it's working! 


And here's the distance from the old "mudroom" to the new one in case you were curious. Oh, and we finally painted the basement the same gray (Benjamin Moore Revere Pewter) as the rest of the house. Although I love yellow in basements, the cohesiveness is so much better. 


Overall, this was a great project and worthwhile investment in our house. I think we're ready for winter! (not really)


5.03.2012

Rec Room Progress

I have finally made some progress getting our basement rec room together. Slow progress, but some progress.  It still needs some more toys purged from it but generally it's getting much closer to what I want it to be.  Of course, I should be spending more time on the treadmill and probably a little less time thinking about the decor!

So, here's where I started back in December.  Actually, this picture was from July but it looked the same even in December.

This was way too much furniture for this space.  The red leather chair on the left found a new home in Alex's big boy room.  The chair and sofa were sold via Craigslist.  (Hello $450!)

Next we moved the family room sofa down to the rec room.  Our sofa looked like this...

 Until I got a slipcover for it and then it looked like this...
Next I brought in one of a pair of chairs previously in the family room (the other is still in the family room), moved in some end tables (one was already here and the other was in the attic), and hung a great new canvas-mounted picture of my kids.  Finally my lamps came back fitted out with their $15 Target shades which happened to fit perfectly without a harp.  Hooray for happy accidents!

After a little bit of tweaking, the room now looks like this.  


More accurately maybe like this...
The sofa works so much better here than it ever did in our family room.  Maybe this was all part of my original subconscious plan! 
Those end tables work well here as well.  They were a hand-me-down from my parents and they have lived in my attic for a few years.  They are perfect down here because they have drawers and storage. Need to brain storm the options...
Also, think I need a couple more canvas prints of my kids.  Looks like I'll be back on the Groupon hunt!  This all leads me to my new color scheme which was previously (in my head only) beachy cream, yellow, blue, and green. Now though I think I am heading in a more colorful playroom direction.  I'm not saying wild color everywhere but a few fun pops of color might be in order.  It's time to stop fighting the toys which dominate this space but embrace them and their wonderful color!
Doing any furniture swapping in your house?  Amazing how different and perfect a piece can feel in a different space.

5.02.2012

Lamps Transformed

I have had these brass lamps since we moved to Arlington 14 years ago.  They have followed me through several apartments and now our house.  They used to be in our living room but eventually they made it back to the attic where they have lived for several years.


I had contemplating spray painting them for a couple of years.  I finally got up the guts to do it last weekend.  Enter Rustoleum Harbor Blue.

The lampshade is from Target and just happened to fit over the existing lamp works so I didn't have to get a harp.

More to come tomorrow...

7.18.2011

House Tour Room-by-Room Link-up Party: Play Rooms, Rec Rooms, Lofts & Bonus Rooms

I've lost count on what week we're in and I too need to check the schedule when writing these posts. Hopefully everyone hasn't disappeared for vacation! This week we're talking rec rooms, play rooms, lofts, and bonus rooms. Here are a few new shots of our basement rec room. This are is affectionately referred to as "downstairs" by my 2 year old since most of his big (and favorite) toys reside here.  As a result, our space often looks like this as you enter.


I'm not sure I've ever shown either view of this room. Probably for good reason. This is our furniture graveyard where furniture goes to finish its life. Fortunately, it doesn't take long to clean up this space thanks to the awesome built-ins that Handy Hubby finished up earlier this year (more about those here)

Here's how the space looked after 10 minutes of much-needed toy put-away time. Honestly, I don't mind seeing the toys because this is the rec room.
I hope to change the hodge podge feeling over the next year or so by moving the red chairs out and some blue chairs in. I want this room to have a beach feeling although without being kitschy beach. Of course all of that will take a lot of furniture moving up and down the stairs which may require lots of begging for Handy Hubby to find a friend to help out.  At this point, I'm planning to make these moves next winter. Hopefully. The couch will likely stay and the coffee table is actually my grandmother's cedar trunk. It needs some work but it will work in the space I hope.

p.s. In case you are curious about the toy train set, it's Fisher Price GeoTrax and any 2-6 year old boy or girl would LOVE it.

Your turn! Please don't forget to link back here or add my button below.


HOUSEography House Tour Link Party

3.16.2011

Built-in Bookshelves: REVEAL!

YES, FINALLY!!!!

The basement bookshelves are done!! Although there are some little things that still need patching and another coat of paint but it is now 99% done and ready for pictures! If you are just starting the tour, we use this as a play room for the kids so toy storage was a top priority. We also have a TON of books so we had to incorporate bookshelves.

BEFORE:

AFTER:


Here's a close-up on the doors that the hubby made. The hardware on the doors is basic Home Depot hardware.

See all of the Playmobil stuff on top? Yup, more in the cabinets. I'll do a post on organizing the toys at some point. We started with a major purge of toys that weren't being played with and then organized the rest. I think we did pretty well!

Hubby also made some pull-out shelves which can be used as a desk or additional play space. I scored the hardware for those little pulls at the Restoration Hardware Outlet for $1.50 each. It was actually hard to find something like that at the big box home improvement stores because it had to be super skinny and had to attach from the front.

The cost was relatively little especially when you consider that we sold our old TV cabinet for $100, the old Ikea bookshelves for $50 and our old tube TV for $50 (!). Thank you Craigslist. Our new TV was an Amazon cyber Monday purchase, and the plywood we used for the cabinet and bookcases is very affordable.

Now I have to start working on hanging some more things on the walls and getting the rest of the room organized.

Can I get a round of applause for the handy hubby!?!


2.28.2011

Built-In Bookshelves (Update 8)

I wish I could say we're done but we're not.  BUT, we are soooo close. It's really down to the right hinges. Yes, hinges. Hinges for the cabinet doors. I cannot wait to show you the doors that hubby whipped up for me in his shop. Lots of magic happening down there (along with dust and noise!). Fortunately we are ordering the hinges we need today so hopefully we really will be done by the end of the week.  HOPEFULLY.  It's really time to move on to other projects.

Now I'll stop talking and show you pictures because I know that's what you really want!


We unpacked 10 boxes of books which is amazing.  We still have a few more to go but I think we'll be able to find space for them elsewhere in the house. We are trying to be better about letting go of books that we know we won't again or which we just don't love. Hopefully that will help us keep our massive book collection under control.

This has been our biggest built-in project so far and it has been a beast but I think so worth it and has such a big impact on the feeling of our playroom. We're sure the kids will enjoy this room for years to come, as will we. I can already see many years of kids' sleepovers happening down here!

As a reminder, here is how this room started -

First with our old stuff.
 Then with no stuff at all.
We've come a long way!

___________________________
Like this post?  Vote for us by clicking here (and that's ALL you have to do)!

2.08.2011

Built-in Bookshelves (Update 6A)

One quick late night post to make-up for this morning's totally lame post.  That didn't really count as an update so this is Update 6A. My hand is completely cramped up from painting so it's amazing that I can even type. As Jim said last night (after doing some painting) that this is the biggest thing we have built by far and he is so right.  We were really hoping to have everything done and reassembled by Friday but that is looking impossible at this point.  I want our playroom back!!! 

So, here's a fun picture of Jim wearing his coveralls from the early '90s when he was in the Navy working as an aircraft mechanic on carrier. I'm fairly certain it was his favorite job ever. Before I knew him thankfully!  He would like everyone to know that they still fit.

 And a few pictures of the bookshelves fully primed and in the process of being painted.
 The large rectangle is for our new television.  I cannot wait to start doing my work-outs down there instead of in the family room.
 
I need to go to bed now so I can do more painting tomorrow night. Jim started building the shelves and the process is going quickly so hopefully we'll be priming and painting those before the weekend.  We'll give everything a few days to cure before putting our junk all over it.  So close!!

2.01.2011

Built-in Bookshelves (Update 5)

Progress on our basement built-in bookshelves was a bit slow over the past week although we have been doing some things to move the process along.  I put a coat of primer on most of the bookcases and cabinets late last week.  Painting is generally my job in these things but I am not a great painter by any means!  We did one coat of primer on most of it so we'll have to finish that this week.  Then we'll sand the whole thing this week.  Finally, we'll add 2 coats of white paint which matches our trim.  I considered doing a color but I think I want to keep it white since the room is fairly small to begin with.    


Jim has also been working on putting in the face frames.  One hiccup was that our usual crown molding won't fit with the can lights so, we'll have to use something smaller.  I'm actually fine with that because I want the basement to have a more casual feeling - thus the bead board backing.

Jim still needs to finish the pull-out shelves and the cabinet doors.  Hopefully those will be done by the end of the weekend so it will be all painting from there on out!

Did you work on any projects over the weekend?  Planning any built-ins in your house?

1.26.2011

Built-in Bookcases - An Awkward Corner (Update 4)

Hubby is still working away on the bookshelves and doing a super fantastic job. (Go Jim!) We're having a few friends over on Saturday for a little party so we really need to get things in shape so we can at least put some spare furniture down there and clean-out the guest room for visitors! Yikes!

We did run into a bit of a dilemma with how to deal with the corner.  Backtracking a bit - we originally were just going to fill the nook in the back of the family room with bookshelves and call it a day.  But, then we started thinking about where to place the TV and sofa, and we realized that putting the TV on the back wall would cause us to put the sofa in the middle of the room and really cut it off.  So we changed it up and moved the TV to the right wall.  
I thought about just putting a piece of furniture under the TV and calling it a day.  A little more thinking and talking and we realized we have a LOT of books still in boxes and if we filled this wall with bookshelves too then we would be able to unpack more boxes.  And, we could use the lower shelves for more toys and kids books.  MORE toys. 

Now we had to create a true corner in the built-in and this was a first for us.  Hubby did a bunch of searching online and in his many woodworking magazines.  We didn't want the span to be too large there or the shelves could not be supported properly.  So, we played with moving the bookshelf to the right of the corner back and forth. 

Here you can see the shelf on the right pushed up to the base cabinet on the back wall.  Jim and our friend Nick thought it closed off the corner too much and they were right (so glad I listened to them). 
So we fixed it by pushing that shelf to the right which creates a more open feeling on the top as well as a set of supportable corner shelves. 
Initially we thought the narrow space on the bottom right of the corner would be a wasted space.  After thinking about it for a few minutes I realized that smaller toys could fit in this space easily, but also small bins or baskets to house toys and later video game equipment or DVDs. 

Out of a problem came a solution and hopefully a really useful space!  Ironically, I think the shelves are going to make the space feel a bit larger because they will contain the stuff and it makes the room feel less long and narrow.  Can't wait to get these painted out and the TV mounted!

What's your latest DIY problem that you are trying to solve?

1.24.2011

Built-in Bookcases (Update 3)

Happy Monday!  Well, hubby really outdid himself this weekend with work on our new built-in bookshelves in the basement.  He spent every spare minute working on them and they are looking really good.  (See the first two updates here and here)  Here's where we were last week. 

That's our cardboard "TV" which we are using to find the perfect location on the wall for the TV.  The bookshelves will go around it. 

Here are some progress pictures over the course of latter part of last week and this weekend. 
 

We are adding two small pull out "desk drawers" for extra play space or even a laptop.  This is a first for us but Jim said it was fairly simple to build.  I can post some close-ups of the underside if anyone is interested in the construction. 
We are also adding bead board behind the built-ins for a little extra interest.  It's fairly inexpensive but adds some additional architectural interest.  Everything will be painted ultimately.  Instead of attaching the bead board to the back of each set of bookcases, Jim attached the bead board directly to the wall.


Jim installed 2x6 blocking between the studs where the TV mount will go.  We have finally learned our lesson on this - so much easier than searching for a stud.  Not pretty but it works. 
 The bead board was then installed over the top. 
The area looks really great and I can't wait to see it trimmed out and painted. We have a busy week and weekend ahead but hopefully I'll have another update later this week. 

Did you make progress on any major projects this weekend?