6.30.2010

Making the Pantry Work Double Time: Kitchen Organization!

Although I love the super clean look of the stainless fridge, there are definitely times when I wish I could just put a note or picture up there.  I do use the small strip between the cabinet and the front which is magnetic.  It's a great place for an invitation and my son's fridge game.

But, ever since we moved in last fall, I had been looking for a place to stick a bulletin board.  The kitchen island had become a landing point for so many things (including small but important pieces of paper) and I was getting really tired of it.  I was inspired when I read this post from my friends over at Young House Love (thanks Sherry and John!).  As soon as I read about their cabinet cork board I started thinking about cabinets that we could use.  We are a bit limited in possibilities because we mostly have glass cabinets on top (except the 2 over the microwave and fridge), and we don't really have any lower cabinets which are large enough (and mostly we have drawers).  The pantry became the obvious choice because we keep our cereal and all of our other dry and non-perishable staples in there - so we open it ALL the time but especially in the morning when we most often need reminders.

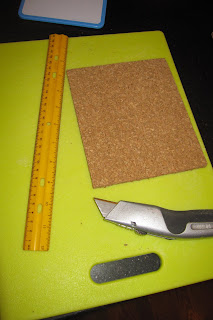
With the location chosen, I got some cork tiles and a small dry erase board at Target.  It was important that anything we attached stayed within the side rails of the door because the drawers are nearly flush with the inset doors.  Cutting the cork board to fit within the rails was really easy with a sheetrock knife (a boxcutter would work too). 
 I also lucked out finding this small dry erase board which fit into the space almost perfectly. 

To attach the board and tiles, I wanted to be sure they were removable just in case I ever decide to take them down or replace them with something else.  I decided to use the Command adhesive strips because they are strong but they come off easily when you need them to. 
Then I started cutting and attaching the pieces to the cabinet door.  The whole project took less than an hour...
And here's the final result!
I added some yellow and white thumbtacks that I already had laying around.  Hopefully this will help solve the island clutter problem.  I'll let you know.

Where do you keep your family's important reminders?   

6.29.2010

And the Britt Neal CD Giveway Winners Are...

Congratulations to our TWO winners in the Britt Neal CD Giveaway -  jroyce36 and Carol Shogren!  We know you'll really enjoy your CDs!

If you are in Maryland, Virginia, or North Carolina, check her out in concert this summer during her Red, Blonde and Blues Summer Tour with the Kirsten Thien Band.  We're looking forward to checking out the show at St. Elmo's on July 7th!  For the full schedule, click here.


You can also download her music on Amazon by clicking here.

Congratulations again to our winners!

More Alternative Headboard Ideas

After posting about my new guest room headboard last week, I found some additional ideas for DIY headboards.  My brother and sister-in-law made the below headboard in their guestroom.  It goes almost all the way up to the ceiling to give the feeling of additional ceiling height.  I love that they can change out the wreath, and the red is a great accent color.  
 

Here are a few other great DIY headboard ideas.  I think this wallpaper headboard is really interesting although I would have considered framing it.


A super easy alternative headboard is a stencil painted on the wall.  Here's a great example with only minimally contrasting paint.  A great idea for apartment dwellers who don't want to mount a heavy piece on the wall.


I hope these give you a few more ideas of how to dress up your bed or guest bed!

To see the step by step for our DIY headboard in our basement guest room, check it out here:  Part I and Part II.

6.28.2010

Crowning Glory: Adding Crown Molding in our Kitchen and Family Room

When we renovated our house last year, we had initially planned to do quite a lot of the finish work ourselves, but as time wore on, we decided to have our builder do most of it.  We did leave a few projects such as our family room fireplace mantle and the crown molding in the kitchen and family room (both part of the new addition). 

After Jim finished the new built-in bookcase in the family room, it was time to move onto the crown molding which would help tie it into the rest of the room.  The crown would also help unite the kitchen and family room with a more cohesive feeling.

When our kitchen cabinets were installed, I realized that the space above them was larger than I wanted it to be.  I wanted the cabinets to go to the ceiling (or close) and just have enough room for crown.  They were about 3 or for 4 inches further down than I thought.  We decided to fill the space with crown molding instead of leaving a space between the crown molding and the ceiling.


WARNING - Crown molding could be one of the most frustrating DIY projects you may encounter.  There were definitely some touch and go moments when Jim was installing our crown molding.  My best advice is to stand back and not offer too much in the way of "help" as this may be hazardous to your health and possibly your marriage!

Fortunately, my dad had given Jim a nifty crown molding jig for Christmas (check it out here) so that helped out a lot.  Once we figured out the correct angle for mounting the molding against the wall and ceiling, cutting the miter joints with the jig went fairly quickly.  The pneumatic nailer is also a lifesaver for this project.  This was definitely a multi-day project with several evenings thrown in but the result was worth it!

Above the kitchen cabinets, Jim mounted a filler strip around the top of each cabinet flush with the front.

Then, the crown molding piece was mounted to the filler strip and ceiling.  Unfortunately for Jim, there were more than 15 cuts in the kitchen alone!  He powered through and I was able to help on filling nails with putty.


Then we painted the molding and the filler strip the same white as the cabinets.  Remember, there are as many shades of white as there are shades of blue so just picking off the color wheel is going to be a real guessing game.  I brought one of the doors to my local Benjamin Moore store and they matched it with their computer.  The color is very close and not noticeably different.
Here are some pictures of the adjoining family room with the molding up.


I am so pleased with the result and think it was well worth the heartburn (well, Jim's heartburn!).  Please feel free to share/vent about your own crown molding hardships!

Like my blog?  Join the discussion on Facebook!  Click here.

6.26.2010

Stepping on Up: The Skinny on Step Stools

I'm a tad bit vertically challenged (5'2") so step stools are just a part of my every day life.  To maximize every space in our kitchen, we chose to have cabinets to the ceiling so I often have difficulty reaching even the second highest shelf without some vertical assistance.  Then throw in changing light bulbs and the occasional cleaning expedition... In come the step stools.


We have loads of them in the house both for me and for the kids (our 4 year old and her friends).  Fortunately I have found a plethora of great stools for various purposes throughout the house which I thought would be helpful to share.

In the first floor powder room, the kids need a step stool to reach the sink.  This one works particularly well because it folds up really small and easily slides between the sink vanity and the wall.  It's plastic so it's lightweight so it won't easily scratch the floor or vanity, but it's also very sturdy for such a small stool.  I love how skinny it is when it folds.  I'm thinking about picking up a second one for our master bedroom closet.


We use this stool for all things in the kitchen (or anywhere else on the first floor) and it neatly hides in the hold everything closet in the kitchen.


Polder 90401-91H 2-Step Mini-Stool
 
This Baby Bjorn stool is the stool du jour in the upstairs hall bath that my daughter uses.  We previously used a taller step stool which Jim made but that's been retired for now.  This one doesn't slip and the black and white matches the color scheme in there. 

BABYBJĂ–RN Safe Step - White


My mom found this one at a yard sale for a few dollars.  Of course, she couldn't pass it up because of the name!  She painted the stool white but the letters were already painted.  Elizabeth LOVES this stool and uses it to climb into her bed.
For bigger jobs (like painting) we pull out a bigger stool with a handle to grab onto.  We got ours when we first moved into this house and it has gotten a lot of use and love over the past 8 years!  That would be a great house warming gift for a new homeowner if you have a party to go to!
Polder LDR-6102 2-Step Designer Step Stool with Rail, Argento Silver

Of course, if you are a handy homeowner, it's hard to live without a good step ladder.  Aluminum ladders are lightweight but sturdy.  Great for big jobs like changing out light fixtures or installing crown molding.

So, that's the lowdown on stepping up on a step stool or ladder!

6.25.2010

Dog Days of Summer: Dining Upgrade for Angus!

We've had our beloved pooch, Angus (a 60 lb pointer/lab mix - we think), for just over 5 years.  The poor dog is sorely neglected and probably appreciates our many vacations because the dog sitters walk him frequently!  Angus drinks a lot of water all day long so I set out to get him a larger bowl so I wouldn't have to refill it 3+ times per day.  I was also hoping for a new food bowl since his old metal bowl is permanently dirty and doesn't fit on the tray where we keep his water. 


I really like ceramic bowls because they are easier to clean than the metal variety.  There is nothing wrong with his old bowl so we'll use it on the back porch for outside doggie refreshment on 90 degree days. 

When I struck out at the big box pet stores, I decided to head to my old favorites - HomeGoods and Marshalls to find a solution.  I stumbled on these white souffle dishes.  Although I had been hoping for a color or pattern, I decided to go for it when I saw the prices - less than $12 for both! 
 
The larger one is for water and holds quite a bit more than his original green bowl.  The smaller one works well for his vittles.  Because they are dishwasher safe, they'll both get more frequent thorough cleanings.  Also the flat, wide bottom makes it much harder (but not impossible) for my trouble-making 1 year old to tip over!  Added bonus - both fit on the white plastic tray we've been using for the water bowl for years which helps keep the floors dry.

I'm so glad Angus was able to get in on the remodeling, redecorating action!  I'd love to hear about any unusual solutions that you've come up with or seen for pet food and water bowls!

6.24.2010

House Plant Follow-Up!

I finally broke down and bought a new house plant.  When I posted last week about my house plant woes, I got a lot of sympathetic emails and some suggestions for varieties to try.  My sister-in-law, Jolaine, told me that the neglected house plant that I already have is a type of Dieffenbachia.  My aunt (who has a seriously huge green thumb) rooted both of the plants from a family heirloom plant and gave Jolaine and me the same plant at Christmas about 2 years ago.  Ours were the same size when we got them.  Mine still looks like this -


And hers looks like this (a veritable tree!) -
Just further proof of my brown thumb!


But, I am testing my skills yet again and got a new houseplant to go in my adorable little white planter.


I got a Hawaiian Schefflera at Safeway this week.  At $8, I won't be heartbroken when it dies (not if, but when).  I chose it because I liked the variegated leaves and the tag said that it prefers moderately dry soil (perfect for me)!  Here she is straight from the store.
Fortunately it was actually planted in a green liner pot instead of its faux terracotta pot, so it only took about 10 seconds to and pop it into my adorable white planter - voila!  A real houseplant!  Now, I'm working out where to put put it.


6.23.2010

Where's Your Accent?: Working wtih Accent Colors

Watching too much HGTV has caused me to start thinking about using more accent colors in our house.  After visiting my friend Colleen at her house in Atlanta a few weeks ago, I started thinking about it even more.  She uses red throughout most of the public spaces in her house and it really looks great.  A friend who sells Southern Living got her into red accents in her kitchen and that ultimately spread throughout most of the main floor of her home.  They have only lived in this house for a few months yet they have so many details totally nailed - especially in the kitchen. 

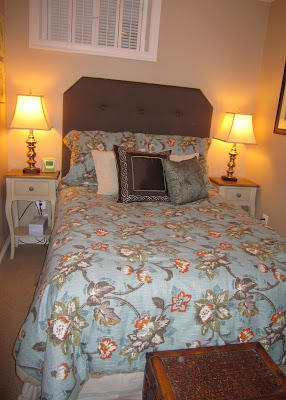
The basement guest room was the perfect place to try out a bold accent color (just like it was the perfect place for the upholstered headboard I blogged about for the past couple of days).  I chose orange from the floral bedspread which I adore.  The simple addition of the small orange pillow and the silk flowers in the vase (in violation of my flower policies!), really made a big difference in the room.

Here's the before - 

 And the after...

It was actually pretty hard to find the perfect small pillow so I ended up turning to Etsy and I found several great options.  This one worked perfectly because I already have several bird accents and this one followed that theme.  
These small changes actually make the room feel really done.  Also, any basement dreariness that may have been emanating from the brown and blues was instantly counteracted by these tiny touches!

I am still contemplating some accent colors in other rooms in our house but this was definitely a good place to start.