Showing posts with label landscaping. Show all posts

10.28.2011

Sprinklers in October

Officially tired of dead grass and shrubs so we're installing a sprinkler system. We ended up getting a pretty good deal through a variety of discounts, and we know we want to live in this house for a long time.

So, lawn looked like this for a few hours earlier this week, but it's much better now fortunately.


Now we just have to figure out how to use it!! Of course, the season for watering is now really short so it will likely be winterized in the next couple of weeks.

Happy Friday!

7.06.2011

Quick fix for an ugly problem

We had an ugly little problem which detracted from our home's curb appeal. Most people probably didn't notice it but I noticed it every time I pulled in the driveway or went out on the front porch. It was this...
Can you see it?  Here's the close-up.
It's actually a pipe connected to our basement sump pump which pumps the water out to the street. It's ugly. And white. Which is not a nice contrast with dark brick.

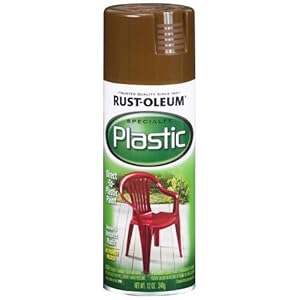
I was tired of it. So, I picked up a can of this -

available here
Of course I didn't want to spray the surrounding brick so I rigged up a shield with an old box which was headed for the recycling anyway.

I also taped off around where the pipe goes into the house so the brick there wouldn't get too much over spray. Sorry, I forgot to photograph that part. And apologies for the darkness of these pictures. I did this at about 8 p.m. last night when the temperature finally dipped below 90 as recommended on the paint can.

And now we have this...
So much better and I won't think about how ugly it is every time I pull into the driveway. We have a few other pipes for our downspouts in back which I may give the same treatment so they blend in a bit more. Unfortunately the plastic paint doesn't come in tons of colors so it's harder to find a good match to the dark green-brown siding. Brown/espresso may be the best option because it at least blends with our brick foundation (which goes all the way around) and mulch.

Did you do any quick fix projects this weekend?

Linking to -

9.15.2010

Landscaping Progress!

We finally got around to a fairly major little landscaping project in the backyard last weekend.  All summer, I have been contemplating a privacy solution for our patio.  Our neighbors next door are great but everyone could use a little privacy, particularly when entertaining.  Our wonderful custom fence is about 4 feet tall which gives a sense of separation but the light goes through and we can still easily talk over the top which we often do.

Above you can see the remands of our portable tomato garden.  Tomato season is done here and was not very successful for me to begin with! Otherwise this is pretty much a blank canvas. 

I had thought about having lilac bushes along that fence.  I love lilacs and they do create some nice privacy without creating a solid wall of shrubs.

Then we started taking other things in our yard into consideration.  We want to get a swing set for the kids which is going to dominate our yard for the next few years.  There were a few plants up against our neighbor's old garage behind our house.  They are planning on tearing down the garage in the fairly near future, so the demolition and reconstruction would mean the shrubs back there would not likely make it through the process since they are so close. 


And guess what was back there - LILACS!  Yup, free for the taking because they are already ours.  We actually transplanted them there soon after moving in.  You can imagine how excited Jim was when I told him that I wanted to move them AGAIN.  These were spindly little trees when we put them there - basically a last ditch effort to do some new homeowner cheapo landscaping.  Eight years later, they over 6 feet tall.

As usual, Jim was a good sport and did 90% of the hard labor. 

So, we Jim dug a really big hole in our solid clay soil using a pick axe and pointed shovel.  It took about 2 hours to get to this point.  Fun times.


Still love me, right?
Fortunately Jim had the foresight to put the dirt on a tarp on our patio which made the clean up loads easier.  We then mixed the clay with peat moss, sand, top soil, and pretty much whatever else we could find in the garage.  It was not scientific in any way, but it generally resulted in much better soil than where we started.  

After a lot of sweating and digging, we finally got the shrubs moved and replanted.  The root balls on lilacs of this size are really small so that was the easiest part of all.  Even if they don't make it, it would be fairly easy to just buy some new trees at the garden center and put them in.  Hopefully these freebies will make it.

The result -


In a few years, I think we'll have some really good privacy and I look forward to smelling the lilacs while we enjoy our patio.  

Total cost - $0 (except for some Motrin that night)

5.27.2010

Best Foot Forward

When you look at the front of your house, what's the first thing you notice.  You have to be objective and not think about how much you love your front door color if the shutters are hanging on by one screw.  If that's the case, no one is looking at your gorgeous door color and everyone is wondering when that dangler is going to fall.  Trust me.  Here's a little bit of our before and after.

The ho hum before - 


The pretty awesome after -


Although we added the portico over our front door, most of the other change were pretty minor.  The new black shutters really make the windows stand out, and moving the gutter pipes makes the front of the house seem larger.  Most houses don't need made architectural changes to gain a lot of curb appeal.  A basic spruce up which costs very little money can make all the difference.

Here are initial things to consider:

1)  Junk, junk, junk - You can make a big change in your house at no cost by removing any junk you may be overlooking.  Remove unused planter and window boxes, flowerpots, broken fencing, and decrepit porch furniture.  Dead shrubs and other plantings should be removed (including stumps).  Even if you aren't replanting new shrubs right away, it will still look better with nothing than with dead stuff.  Cost: Free!

2)  Paint - Peeling paint on your siding, trim, or door will majorly detract from your house.  Get out the can or hiring someone to get it done.  Be sure to prep the surfaces well and replace any rotten or cracked wood along the way.  Cost:  Varies

3)  Clean it up - Power wash any vinyl siding, unfinished decking and fencing, and sidewalks and driveways. Cost:  Free if you have a power washer or you borrow a friend's, otherwise about $25 to rent one.

4)  Landscaping  - Trim the shrubs!  I did this last weekend and it made a huge difference in the look of our house and the shrubs will do better over time.  If you cannot plant new shrubs, plant some inexpensive annual flowers appropriate for the season for color and interest.  Even a large planter on the front porch with colorful flowers can brighten up the overall look.  Plant grass seed on any bare patches, or invest in a little bit of sod to fill any holes - much quicker and easier to maintain.  Spread fertilizer and weed killer to start building up your existing lawn.  Cost:  Varies but potentially free if you are just trimming and removing dead stuff.

5)  Shutters (if you have them) - Rehang any fallen or dangling shutters.  If you have broken shutters, fix them or take ALL of them down unless you plan to replace the broken shutter quickly.  Paint the shutters if they look faded or have pealing paint.  Consider replacing wood shutters with good quality vinyl or fiberglass to avoid ongoing maintenance.  If you want to paint them a new color and don't know what to paint, black is almost always a good choice and can be achieved with a can of good spray paint.  Cost:  Starts at about $50 per window for new shutters.

Heath Zenith SL-4192-BK Six-Sided Die-Cast Aluminum Lantern, Black with Beveled Glass6)  Light Fixtures - Replace any missing or burned out bulbs with bright compact fluorescent bulbs (cheaper to run and don't need replacement nearly as often).  Replace fixtures that are broken, dated, undersized, or just plain ugly.  No electrician required in most cases so long as you have existing fixtures.  Bonus points:  Connect exterior lights to timers allowing them to turn on and off automatically.  Cost:  Starts at about $25 each for new fixture and $25 for the timer.

7)  Fences - If you have fences in your front yard, be sure they are in good repair - no pealing paint, missing parts, or broken gates.  If you can, remove any chain link fence since that will add nothing to your home's curb appeal.  You'll be amazed by the difference, and good fences don't necessarily make good neighbors - especially in the front yard!  Cost:  Free if you are just removing.

Here are some good resources on gaining curb appeal from This Old House, BHG, and HGTV.

Let me know if you have other low-cost ideas on how to spiff up your abode.  Be sure to send before and after pictures!


7.13.2009

Renovation: Kitchen! Railings! Patio!

Well, 17 days and counting until we move back into the house and things are really moving now. I feel like the progress is really tangible on a daily basis. I haven't felt this way since framing. The most major change right now is that the kitchen cabinets are in. They are made by Kingswood Kitchens and were ordered through Bergman Custom Casework in Queenbsury, NY. They are absolutely beautiful - I am thrilled with results! We made the decision to do a lot of drawers instead of lower cabinets. There are a few lower cabinets but we tried to minimize them since I hate how things always get stuck in the back! We are ordering our countertops this week and hopefully they will be ready to install next week before the floors are finished. We are opting for honed Absolute Black granite with a permanent sealer. More on that decision later...


The stair railings have also been installed and they look really great. We opted not to have a railing on the side of the stairs coming into the kitchen because it's only 2 steps and it keeps it more open. The code allows for this because there is a continuous railing on the other side and it's less than a certain height so there is limited risk of falls. You can see it in the pictures in the Construction album.

We also opted to get the landscaping in the backyard started. We are using a local family-owned landscaping business, Hambletons, which we have used before for small projects and spring yard clean-up. The patio will probably be finished in the next day or so, and then the sod will go down. We'll have to see if we can borrow a neighbor's hose to water it until our water is back on in a week or so. Let's hope we get some decent thunderstorms - but of course after the wettest spring in years, the forecast does not have any rain in it!

6.15.2009

Insulation and.... Drywall!

We have completed our mechanical inspections and will start insulation tomorrow. That will probably take 2 days and we'll get our insulation/close-in inspection on Wednesday. Our builder will be stocking drywall on Wednesday so they can begin on Thursday!! Needless to say, we're incredibly excited about drywall because it feels like the top of a peak and then we're just on the downhill! Drywall will take about a week according to our builder.

After drywall comes the floors which will probably take several days since there is a lot of patching and matching to do. The floors aren't finished until after the painting and trimwork is done though. We have picked out tile for our master bathroom and laundry room. The rest of the house will be hardwood to match our existing floors.

On the outside, a considerable amount of work has been done on grading the backyard and installing drain pipes for the gutters (not yet installed). We have also had a drywell dug which we are now wondering if it's not deep enough since the water doesn't drain. Keep in mind though, we have clay soil so the bottom of the drywell is like a rock! Our contractor added a drainage ditch behind the garage to help handle some of the drywell run-off. Hopefully all of this will help the water issues in our yard although I don't think it will be entirely well-drained even after all this. There are just too many places for the water to come from and flow into our yard.