Showing posts with label guest room. Show all posts

5.31.2011

House Tour Room-by-Room Link-up Party: Guest Rooms

Hope you had a wonderful Memorial Day weekend. It was blazing hot here in Northern Virginia but I absolutely love the heat (really!) so no fantastic for me. I love a hot Memorial Day weekend so we really know that summer is here. It's supposed to be in the 90s here all week so I guess summer is here to stay now!

We're back again for another Room-by-Room House Tour Party. This time we're checking in on your guest rooms. Are they guest worthy? Still a work in progress? Hotel perfect? Let's see them!!  Even if you just have a nook for guests, let's see it! 

We have 2 guest rooms which is really great. Our upstairs guest room is nothing fancy and I really don't love it at all. Definitely the dumping ground for stuff. It's all temporary though because my son will be moving out of his nursery into his big boy room later this year or early next year.  There's a picture way at the bottom of my house tour if you are dying to see it.


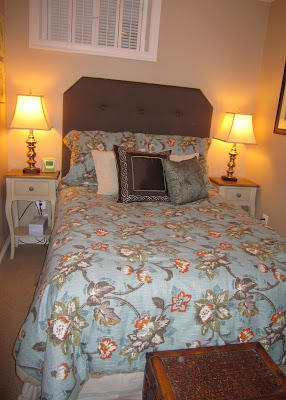
Our main guest room is actually the smaller of the two but it's in our basement (errr... garden level?) and has its own en suite bathroom. It's barely big enough for the double bed but it works well for our guests so far. Our goal was to make this a cozy and private space for our frequent guests. I think the private bathroom is key for privacy for guests. They love it!


Sources: Headboard - DIY; comforter - JC Penney (discontinued); cream pillows - Target; brown pillow - HomeGoods; orange pillow - Etsy; bedskirt - Bed Bath & Beyond; footstool - Marshalls; night stands - HomeGoods (knobs Anthropologie); dresser - used; sea life artwork - Bed Bath & Beyond; vanity - Home Depot; faucet - Moen Chateau; shower curtain - HomeGoods; bird art - Target; orange towels - Amy Butler (Bed Bath & Beyond); towels - Marshalls; tile - Home Depot.

Now it's your turn! Please be sure to link back or use my button below. Thanks!


HOUSEography House Tour Link Party

4.13.2011

Guest Room Updates!

I probably should have saved this for guest bedroom week in my room-by-room house tour party but I just couldn't wait (and I don't have much else going on here!).  Although I loved the bed spread (discontinued from JC Penney - sorry!) and our DIY headboard in our basement guest bedroom, I never liked the bed skirt. That's kind of an understatement - I hated it. It never seemed to fit the bed correctly and always looked cheap and limp. It was the matching skirt for the spread (it was a bed-in-a-bag set) and I really needed a skirt because the bed just has a basic frame (and we occasionally store extra toys from the playroom under there). In short, it wasn't doing anything for the room or the bed.

I had not been looking for a skirt expressly but I was perusing the online clearance at Bed Bath and Beyond a few weeks ago and found a tailored Nautica skirt in brown and blue which seemed like it might work. And it was $9.99 so kind of a no brainer. I finally got around to ironing it and putting it on the bed tonight. It's definitely not high quality but bed skirts definitely don't get a lot of use if you know what I mean.

 And here's the new after picture.
 It actually fits!!!  Woohoo! And really clean looking.

But the fun doesn't end there. In the same BB&B clearance sale, I found four framed sea life prints for $2.99 each. When I bought them I wasn't sure if I would give them to my mom or find a place in our house because I didn't have a spot in mind exactly. But, as I was putting the bedskirt on the bed tonight, I started thinking about the blank wall over the dresser in the same room. Hmmm...
We had originally been thinking about getting a small LCD television for in here because our families (our most frequent visitors) all enjoy TV but there already is another TV right outside in the playroom, maybe it's not necessary at least at this point. We could also hang a TV behind the door if we ever wanted to (and we may). So, I grabbed a hammer and put these guys using just my eyeballs and no level. I got so lucky - only 4 nail holes!


You cannot really tell in these pictures but the frames have a blue-gray tint which picks up the spread color and the prints, of course, have my favorite accent color - orange!

One tip when you are hanging groups of things on a wall: Most wall galleries and groups of pictures on walls look better with smaller yet relatively consistent spacing between the pictures. If you hang them too far apart, they seem disjointed and not part of a real group.

So, the grand total for all of the updates including shipping was $28! Yippee for great deals!! What are your favorite online "clearance racks" for perusing!!

6.29.2010

More Alternative Headboard Ideas

After posting about my new guest room headboard last week, I found some additional ideas for DIY headboards.  My brother and sister-in-law made the below headboard in their guestroom.  It goes almost all the way up to the ceiling to give the feeling of additional ceiling height.  I love that they can change out the wreath, and the red is a great accent color.  
 

Here are a few other great DIY headboard ideas.  I think this wallpaper headboard is really interesting although I would have considered framing it.


A super easy alternative headboard is a stencil painted on the wall.  Here's a great example with only minimally contrasting paint.  A great idea for apartment dwellers who don't want to mount a heavy piece on the wall.


I hope these give you a few more ideas of how to dress up your bed or guest bed!

To see the step by step for our DIY headboard in our basement guest room, check it out here:  Part I and Part II.

6.23.2010

Where's Your Accent?: Working wtih Accent Colors

Watching too much HGTV has caused me to start thinking about using more accent colors in our house.  After visiting my friend Colleen at her house in Atlanta a few weeks ago, I started thinking about it even more.  She uses red throughout most of the public spaces in her house and it really looks great.  A friend who sells Southern Living got her into red accents in her kitchen and that ultimately spread throughout most of the main floor of her home.  They have only lived in this house for a few months yet they have so many details totally nailed - especially in the kitchen. 

The basement guest room was the perfect place to try out a bold accent color (just like it was the perfect place for the upholstered headboard I blogged about for the past couple of days).  I chose orange from the floral bedspread which I adore.  The simple addition of the small orange pillow and the silk flowers in the vase (in violation of my flower policies!), really made a big difference in the room.

Here's the before - 

 And the after...

It was actually pretty hard to find the perfect small pillow so I ended up turning to Etsy and I found several great options.  This one worked perfectly because I already have several bird accents and this one followed that theme.  
These small changes actually make the room feel really done.  Also, any basement dreariness that may have been emanating from the brown and blues was instantly counteracted by these tiny touches!

I am still contemplating some accent colors in other rooms in our house but this was definitely a good place to start.

6.22.2010

DIY Headboard: Part II (The BIG Reveal!)

Yesterday, I did the first post about our DIY upholstered headboard.  Today's post is the finale and the big reveal!


After covering the buttons, I placed each button on the headboard in the approximate location where I wanted it to go - 3 across the top and 4 on the bottom.  I marked each location, then using some heavy duty twine and a needlepoint needle (with a large eye for the string) I poked through the peg board holes in the back through the foam and fabric on the front.  I then strung the button onto the string and poked the needle back through another hole in the peg board.  While Jim pushed on the button in the front, I pulled both strings in the back and tied them off very tightly.  We did each of the seven buttons in the exactly the same way and tied off each tightly.  The result is a sophisticated tufted headboard!


We hung it on the wall tonight using a simple cleat system - one piece of MDF (about 25" long) flat on the back of the headboard with a 45 degree angle across the edge.  We hung another piece of MDF on the wall with the opposing 45 degree angle, then slipped the headboard over the wall cleat.  The headboard is heavy enough not to slip off, but if we feel we need more stability, we can put a few screws in through the bottom frame of the headboard behind the bed.

And now, the room before the headboard...

And here's the after...


Even Jim had to admit that it looked really good.  I'm sure this won't be my last upholstered headboard.  I have some long term plans for our master bedroom...

6.21.2010

DIY Headboard: Part I

This is my 50th blog post on HOUSEography!  I hope I am as excited about the 100th and 200th posts as I am about the 50th!  Back to business.

I have been wanting to make an upholstered headboard for a ridiculously long time.  I love the luxurious and cozy look they give a bedroom, but until now I didn't have the right spot.  Our basement guest room seemed liked the perfect spot to try one out.  It's a small room so a real bed frame was not going to work since there is barely enough room for the mattress.   Also, the area under the uncentered window makes wall decor challenging.


So, we decided to DIY an upholstered headboard, and I got some additional inspiration from my friends over at Young House Love.   This entire project cost me less than $45!

We started with a piece of peg board that we had leftover from a pre-addition furnace surround.  We did a standard 54" wide for a full size bed and I went with a slightly higher 36" tall.  

For stability and depth, Jim took some scrap pieces of 3/4" MDF and nailed them around the edges.  For interest, we cut the corners on the diagonal (6" x 6").


I then took some basic green foam from JoAnn Fabrics, and some white quilt batting (crib blanket size), and stapled each to the headboard around the edges (mostly just to keep it from slipping while I worked the fabric on).


Next, I chose a chocolate brown fabric which I found on the sale remnant table at G Street Fabrics.  I thought the dark brown would stand out nicely against the light mocha colored walls and pick up the deep tones in the bedspread.  After a quick ironing, I placed it over the padding and flipped it over.  Starting at the center of the top, then center of the bottom, then each side, I stapled the fabric on the back with a staple gun
I then worked around the head board, pulling the fabric so it was taught and stapling about every inch to inch and a half around the outside.
For an extra luxurious and custom look, I wanted to add buttons to make the headboard appear tufted.  I made covered buttons using a readily available covered button kit (about $4 for 3 buttons).

The buttons were surprisingly easy to make.  I snapped together 7 of them in about 20 minutes with  fabric scraps that match the headboard using the pattern on the back of the button package.  
Check back tomorrow to see the final steps and the finished product!

Click here to see the big reveal.

6.10.2010

Mini Makeover - Nightstands!

This is a mini make-over in all senses of the word - size, time commitment, and cost!  I found these cute nightstands for our basement guestroom about two months ago while shopping with my mom at HomeGoods (we both LOVE that place).  I had limited options because of the narrow space between the wall and the bed so these fit the bill.  And, the price wasn't too bad either - about $75 each.
 
The one thing that always bothered me about these was that the handles were white, too small, and very cheap looking.

So, I gave them a mini-makeover tonight with two new knobs that I got at Anthropologie.  I love them and I think they really make the little nightstands look SO much snazzier and unique.


No comparison, right?

Also, check out how nice it looks with the sheets and bedspread.

It took me longer to write this post than to do the make-over!

5.30.2010

Guest Room: Lovin' our Guests!

Over the last few months, we have been working on making our own guests spaces nice for our family and friends.  For our new basement guest room, we recently found this fantastic dresser at a local flea market (Eastern Market for the DC locals).  We were very constrained in space because of the closet and main doors, but this one fit perfectly.  It also has a fun secret drawer on the top!  As an added bonus, we got it for less than some options we found at Target and Ikea and this one was probably made in the 1920s out of REAL WOOD - shocker!  Just one of the many reasons why I love used furniture.

In our upstairs guest room, we have a lot more closet space (over 7 feet wide!!!) but no real space for a dresser in the room.  I've considered putting drawers in the closet, but in the interim we have a small night stand with a lot of drawers and plenty of shelf space in the closet.
Stay tuned for our next project - making an upholstered headboard for the basement guest room.  We're hoping to start tackling it this weekend (fabric purchased and measured drawing completed!) so hopefully I'll have something report back on next week.

I would love to hear about some of your decorating questions to see if I can help you out.  Just shoot me an email and ask away!  I may even feature your question (and hopefully the resulting changes) in a future post.

5.29.2010

Steal-ography: Bed-to-Go

Continuing the guest theme, here's a great deal on an AeroBed inflatable guest bed!  Great if you live in a small apartment with no guest room - if you have floor space, you have a guest room!  We use ours for when we have loads of guests in town and we need extra sleeping space.  It blows up in seconds and is surprisingly comfy.  We've also taken ours on trips where we know sleeping accommodations are limited.  At about $70 and free shipping, it's a steal!


Aerobed Guest Choice Queen Inflatable Bed


Found a good deal?  Email it to me!