4.08.2011

HOUSE TOUR PARTY - Link Schedule!

I was updating my house tour pictures over the past few days and had a light bulb moment.  

 How about a series of house tour link-up parties so everyone can show off their rooms? 

So, that's what I'm doing!

 
The party will start each Monday for the next few months and continue until I run out of room ideas. This is not only a chance to post about your finished rooms but also I am hoping people will post about renovations or redecorating ideas that you are considering for that room or area of your house. Maybe you'll get some great feedback. Basically, any post involving some aspect of the "room of the week" is all that is expected!


I hope these link-up parties will serve as a library of ideas anyone looking for decorating ideas for a specific area of their home. All parties will be open for a week to give everyone plenty of time to do write a new post if necessary!

So, here's the schedule so you can plan ahead (or not). If the date has passed, click on the link to see the party post.

HOUSE TOUR LINK PARTY SCHEDULE

[updated on April 13th]
Monday, April 11th - Family Room, Living Room, Great Room (or wherever you do most of your living)
Monday, April 18th - Dining Room or Eating Area
Monday, April 25th - Home Office, Craft Room, Sewing Room, "Mom Cave"
Monday, May 2nd - Kids' Rooms, Nursery, or Pet Room
Monday, May 9th - Kitchen
Monday, May 16th - Living Room, Library, or Other Formal Room
Monday, May 23rd - Bathroom
Tuesday, May 31st - Guest Room
Monday, June 6th - Master Bedroom
Monday, June 13th - Porch, Deck, Sunroom, or Balcony
Monday, June 20th - Curb Appeal and Front Door
Monday, June 27th - Front Entry, Hallway, or Stairwell
Tuesday, July 5th -Yard or Landscaping
Monday, July 11th - Garage
Monday, July 18th -Playroom or Rec Room
Monday, July 25th - Mudroom or Back Door
Monday, August 1st - Finished Basement
Monday, September 6th - Closets [updated schedule]
Monday, September 12th - Workshop
Monday, September 19th - Laundry Room
Monday, September 26th - My Favorite Room!
Monday, October 3rd - Whole House Tour

If you link-up, please include my House Tour Party button or a link to my blog in your post or somewhere on your blog!

HOUSEography House Tour Link Party


I look forward to seeing all of your brilliant decorating ideas!

________________________________
If you liked this post, follow HOUSEography on Facebook or Twitter!

4.07.2011

Getting our compostin' on: FAQs

Before we talk about rotting veggies, I have to wish my beautiful little girl a happy 5th birthday! Time flies but I enjoy each age even more than the next so there is always something to look forward to (except maybe the teen years!).


Back to the regularly scheduled programming...

As I blogged about yesterday, we're getting our compostin' on. In case you are thinking about composting, I wanted to share a little bit of the stuff that I have come up with in my composting research. Yesterday, I posted about our new compost tumbler so today I thought I would give you an idea of what we plan to compost and not compost. We also plan to involve the kids as much as possible, so we'll let you know how that goes. I have a feeling they are going to be itching to give their unwanted veggies back to the garden!

First, here are some of the sites that I used to come up with these answers. These sites are FILLED with info so definitely check them out if you need more info.

VegWeb
Mike McGrath
eartheasy
EPA
Planet Green

Q: Why compost?
Composting takes stuff you would throw away and turns it into a great soil supplement for your garden, plants, or shrubs. This minimizes waste that goes into landfills and incinerators. Compost is better for the environment than chemical fertilizers.

Q: What can we compost?

An amazing amount of stuff! Everything from strawberry tops to dryer lint! Here's a list of what we plan to try composting:
  • fruit and vegetable scraps
  • coffee grounds
  • grass clippings
  • leaves (ground up in our leaf vacuum)
  • flowers and cuttings
  • crushed eggshells
  • dryer lint
  • shrub prunings
  • saw dust (hubby is happy!)
 If you have a giant compost pile, check out these ideas. Condoms? Really?


Q: What should we not compost?
Although most things are technically compostable, there are a lot of things that won't compost quickly or they will stink and therefore attract rodents. Yuck. So, these are the things that we will not be composting (among lots of others I'm sure).

Q: What's a good mix of compost?

It's important to balance between nitrogen and carbon compost. Carbon-rich material (ground leaves, sawdust, eggshells) keeps the compost lighter. Nitrogen-rich material (grass clippings, fruit and veggie scraps, shrub clippings) help make the enzymes necessary to break-down the compost. Here's a great list from eartheasy which delineates between the carbon and nitrogen. Most sites recommend getting a compost accelerator which can be purchased at garden supply stores.


Q: Does it smell?
It should not smell rotten or gross, but earthy. We'll have to let you know as we continue along in this process!

Q: Where should you put the compost bin?
I have heard a mix of advice between sun and shady locations. Some sun seems to be required to help create the heat necessary for break-down. For now, we are putting our tumbler near our trash cans for convenience which get some afternoon sun but not full day sun.

Q: How long until the compost is ready to be used?
I've heard a range of answers which probably depend on what you are composting. It seems like 8-11 weeks is a safe bet. When our compost tumbler gets fairly full, we'll probably move the compost to a smaller plastic storage bin with a tight-fitting lid so it can "finish" in there. We can store a few of those discretely next to our garage until we are ready to use them.

Q: What do you do with the compost once it's ready?
The compost can be added to soil around plants and shrubs. You can add it to veggie gardens but it seems that this should only be done after harvest because the compost should sit for several weeks before planting.

I hope you found this little summary helpful! I'm sure there will be loads of other questions as we go along so I'll work on keeping this list updated as I have more questions and find the answers!

* * * * * * * *
House Tour Link Party starts MONDAY with LIVING AND FAMILY ROOMS! Full schedule and details right here tomorrow!

4.06.2011

Getting your compostin' on: The Stuff

To be honest, where I grew up in upstate New York, composting was something that farmers did with old junk they had laying around their farm. Most of the stuff probably would not meet today's suburban composting standards, but it probably worked. A few weeks ago, I decided that we should give composting a go. We had been talking about it for about 2 years and spring seemed like a good time to start. I did a little research and asked people on my Facebook page for advice. I got a lot of great feedback.

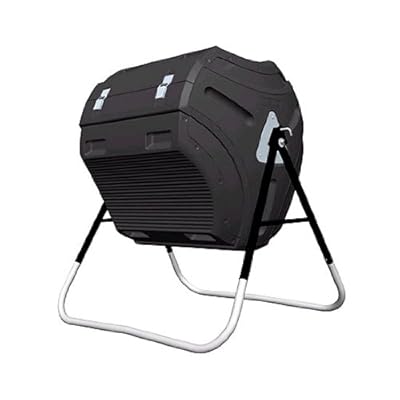
A couple of people mentioned that this great compost tumbler is currently sold at Costco for about $90!
 

Bargain shopping is a great way to start the composting project (at least for me). This is a pest-free model which is critical for us since we live in a decidedly urban suburb where raccoons and rats are frequently on the prowl in our neighborhood. Jim spent about an hour and a half assembling the tumbler earlier this week. You definitely need a drill in case you are considering this model. I had considered the bargain route that John and Sherry at Young House Love took, but I knew we would outgrow it quickly. We may use this method if we want to move some of our half-baked compost out of the tumbler to "finish" it for a few weeks before we use it.

We also needed something to keep compostable kitchen waste in. Thanks to Facebook, someone else recommended this cute kitchen compost jar from World Market which I picked up last week during their friends and family sale.


Next up is figuring out what to compost and, maybe more importantly, not to compost! More on that tomorrow!

4.05.2011

Meet the Parents' {Beach Condo}

We spent 5 days last week at my parents' beautiful beach condo in Siesta Key (Sarasota) on the gulf coast of Florida. We spent most of our time at the beach and pool, and cruising around on my dad's boat - just generally relaxing.


My parents have owned this condo for 6 years and spend about 3 months there each winter (they live in upstate New York the rest of the year). Last Fall they spent two months fully renovating almost the entire unit including reconfiguring the main living area to create a better floor plan for their purposes. Although they still have 2 bedrooms and 2 bathrooms, the place now feels so much larger even though they only widened the living room by 28 inches!!! This is proof that every inch counts in a small space!

Here's a quick tour of their renovated space!

Here's their kitchen which they renovated in the Fall of 2009. The horrible white '80s laminate cabinets and counters went out and these gorgeous cabinets went in with lots of glass fronts, Corian counters, and sandy backsplash.
They also tore out the entire wall that made up the corner of the kitchen. There used to be a tiny pass-through to the dining area which was pretty much worthless.
 Here's the dining area which really doesn't get used all that much in favor of eating on the screened lanai!
Here's the living area. The wall behind the two chairs on the left used to be 28" in and aligned with the wall on the immediate left.
 
Here's the new wall which was pushed back 28". Before the renovation, the master bedroom had a wall of closets. They sacrificed those but found room for a walk-in closet where a useless hallway used to be.

My mom is as great decorator with most of her finds from yard sales, thrift stores, and other deeply discounted furniture and accessories.

My craft mom decoupaged starfish from a wallpaper border on these stools which she got at the Salvation Army store. I love them!
Here's their master bedroom which is still plenty big enough for a kind sized bed, a large dresser and a another large storage piece which houses their printer and other stuff.
 

To give you an idea of what it looked like BEFORE, here are some old pictures that I had. No pictures of the old kitchen because I guess it wasn't worth photographing!
before
before

Here's another picture from another unit to give you a better idea of what they were dealing with when they bought it (minus the nasty old carpet).
long before

My parents rent their place a few months per year. If you are interested click here. It's a 2 week minimum but believe me, you'll want to stay two weeks!

4.04.2011

You can find me at...

You can find me over at Cleverly Inspired! Thanks Tracie for having me! Please check out her blog for loads of great ideas!


We just got back from a few days at the beach so I'll see you right back here tomorrow!

Happy Monday!