4.28.2011

These chairs are heartbreakers

I may be a bit too in love with our eating area chairs. A couple of weeks after we got them, my five year old daughter was messing around (read: not sitting in the correct position) and flipped the chair over backwards. She was totally fine but a little shocked. I was not totally fine and a little shocked.

[sound of me sniffling]

Handy Hubby jumped in with two feet hands and fixed it with some wood glue. Fortunately it was a clean break.
 Then some clamps to hold it in place for about 48 hours.

And then, good as new... for now.  [sniffle]

4.27.2011

Simple DIY Pillow Covers

I have been looking for MONTHS for pillows for our living room. I love the new chairs but finding pillows that I liked was a challenge. I had lumbar pillows in a navy blue geometric pattern in my head. Everything I found was $80 or more and I just refuse to pay that for pillows in a room which gets limited use. Impossible. Where is navy blue in decorating accessories lately? It has all bet disappeared which is sad. Everything is green and tan. So... I decided I would have to make them. I stumbled on some great fabric on the remnant pile at a local fabric store. Actually I found A LOT of it so it will likely show up in a future project.

I debated for about a month whether I wanted to have pillows of all one fabric, or two or more fabrics. Finally, I decided on simple. Then I went looking for pillow inserts. I love down throw pillows but they were way out of my price range. So, another few weeks went by.

Then I was walking through Ross the other day and found these pillows.
Down-filled lumbar pillows for $8.99. Yes! The current covers aren't my style but fortunately they have a zipper, so I'll sell the covers in my yard sale. Actually one cover was really ripped so I got that one for 20% off. Even better.

So I spent about 3 hours last Saturday sewing some pillows. I used the envelope style instead of a zipper - much easier. Basically the back has two overlapping pieces where you can insert the pillow. I should have taken some pictures of the process. I used one of the covers as my pattern for the others.

Apologies for the lack of in progress pictures, but once I started sewing, I couldn't stop for fear I wouldn't start again for another month!

Here's the result. Not bad I think and they will definitely serve the purpose for what I wanted
I love that all of the chairs are cohesive now. honestly, I am really tired of the rug in there because there is so much red in it, but I cannot justify getting rid of it at this point. We paid a lot of money for it and we don't use that room enough to make it worthwhile at this point. Fortunately I don't hate the rug. Yet.

So, I'm living with it. For now.

Are you doing any sewing projects this week?


Linking up to...

4.26.2011

Easter Decorations & Link Party Dining Rooms Highlights

Hopefully everyone had a great holiday weekend and a nice Easter (if you celebrate of course). We had a blast with a neighborhood Easter egg hunt, a relaxing afternoon, and a ham and homemade mac & cheese dinner with great friends. Wanted to share a few quick pics of my Easter dining table before showing some highlights from last week's link party.

Serendipitously I had forgotten to take the bows off the chandelier after Kim's baby shower, so I just added a silk flower garland that I bought at A.C. Moore before the shower but used on the mantel. 

I couldn't resist folding the napkins like bunnies. Ridiculous but so cute. These directions from Good Housekeeping are very easy to follow, even after a mid-afternoon glass of wine.
My five year old made everyone's place cards. I love place cards because then there's no debate where everyone is going to sit - they just sit. I think people like not having to think when they sit down for dinner.

Enough with Easter. The decorations are coming down tonight.

Now for last week's link part favorites! Thanks to everyone who linked up their dining room ideas to the HOUSEography House Tour. I hope you are having as much fun as I am looking at everyone's great ideas.

Gorgeous console table arrangement at Involving Color

Dramatic windows at Calypso in the Country

Inspiring wainscoting before & after (and tutorial) at The Mustard Ceiling

Great DIY projects (and gorgeous windows) at Lovelace Files
Simple but sophisticated centerpiece at Keeping Up With the Joneses
Hope you enjoyed these and all of the other great posts (too many favorites to list here!). Be sure to link up your home office, craft room, sewing room, Mom Cave, or any nook in your house where you can achieve these goals. Click here for more details.

__________________________________
Vote for HOUSEography on Picket Fence Blogs every day by simply clicking HERE (and that's it). Thanks!!

4.25.2011

House Tour Room-by-Room Link-up Party: Home Offices, Craft Rooms, Mom Caves, etc.

Wow! You guys brought your A-games with your dining room posts last week! I'll do a quick round-up of some of my favorites tomorrow.  We had lots of new posters last week which is so much fun! The dining room party is open for a few more hours if you still want to post! And, here's the full room-by-room schedule in case you are a planner!


This week's party is for home offices, craft & sewing rooms, and Mom caves. Ironically, we don't have a home office, sewing room or Mom cave. Jim would argue that the whole house is my "cave" so maybe that's part of the issue. We do plan to reinvent our home office after Alex moves to his new room later this year or early next year (currently the upstairs guest room), so I am really looking forward to seeing your rooms and maybe stealing some of your great ideas!

If you look at Alex's current room, you can see the remnants of our home office in the built-ins that Jim built. The changing table was once our desk with a pencil drawer below, and the drawers to the right are actually file drawers (still are actually). Obviously the bookshelves also lend a lot of function to this room both as a nursery and as an office.

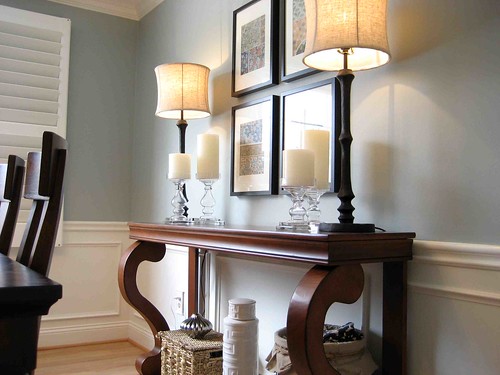
We currently do most of our office work in the kitchen, family room, and dining room. We keep our printer, files, and other office supplies on the dresser that Jim rebuilt last year.

This actually works quite well for us and I wonder how much we would use an actual home office, and I'm not sure I would want to give up our printer on the first floor.

So, if this isn't enough eye candy for you, I wanted to share my friend Colleen's Mom Cave, Willow House headquarters, and craft room. When we last visited them almost a year ago, this was their guest room and now it's this awesome Mom Cave! It's on the second floor of their home outside Atlanta.

 Amazing craft closet

 The window seat - my favorite part!
She bought a lot of the pillows, window seat cushion, and curtains from Etsy and repurposed loads of stuff she already had including a kitchen cart for her Cricut machine and other crafting supplies in the closet. If you have questions, please put them in the comments and hopefully she'll drop in and answer them! Thanks Colleen for letting me share your amazing Mom Cave!

Now, it's your turn! Please link-up any blog post about your home office, craft room, Mom Cave, or other special nook in your home. The post does not need to be new but just needs to feature that room in some way (new table, art, rug, etc.), and your room does not have to be "finished" by any means. Maybe other readers will give you some great ideas!


Please include my House Tour Party button or a link to my blog in your post or somewhere on your blog! And, please feel free to spread the news on Twitter and Facebook so we can build a great library of decorating ideas!

HOUSEography House Tour Link Party


______________________________________________
Find us on Facebook , Twitter, and Pinterest!

4.22.2011

Happy Earth Day!

Probably a total cliche to talk about environmental stuff on Earth Day but so be it. If you told me 10 years ago that I would be "environmentalist" I would have laughed in your face. We didn't even recycle back then - at least not regularly. But, somehow 10 years of life and 2 kids, and watching video of polar bears swimming between ice flows (thanks Al Gore) has brought me around. Although I am not a crazy tree-hugger by any means (although my brother would probably disagree), I am really happy we've made some important but relatively simple changes in our lives which will hopefully help decrease our impact on the Earth. Here are a few changes we've made which I think are relatively simple for anyone to do.

www.earthday.org
1) Recycle. Recycling is super easy especially now that most municipalities offer recycling services. Admittedly, it's soooo much easier when your recycling is picked up at the curb like it is in Arlington. As a sign of the times, the County recently upgraded everyone to a much larger recycling container which is almost the same size as the regular trash can. We previously had a small bin which barely held a week's worth of newspapers. We recycle all plastics, metals (including tin foil), glass, and as much paper as possible.We have a small recycling container behind our pull-out trash can and a paper recycling basket in our kitchen closet. Keeping the recycling containers handy makes all the difference. I am considering putting a recycling container upstairs so I can easily sort before they go in the regular trash cans.

2) Lights. As I am writing this, I am noticing how many lights are on around here. Earth Day Fail! I have been making an effort to turn lights off at night so only the rooms we are using have lights on. In addition, we are using table lamps instead of the overhead can lights more and more.

Sylvania 29490 23-Watt CFL Mini Twist 6 pack, Soft WhiteI have also been working on changing out our incandescent light bulbs for CFLs. Generally, the only bulbs we haven't changed out are the dimmable lights - chandeliers and flood lights for the most part. I still haven't changed all of the guest room lights but those rooms are rarely used so the impact would be minimal compared to the cost to change them out. I also need to change out the bulbs in a few overhead fixtures upstairs - maybe this afternoon! I generally use the Sylvania bulbs that I buy at BJs Warehouse. The Sylvania CFL instant-on bulbs are really great for bathrooms or anywhere you need immediate bright light. They cost about $10 for four 60 watt equivalent bulbs, compared to $11 for eight of the regular CFLs.


3) Compost. We started composting earlier this year which we hope will have the dual benefit of helping reduce waste that goes to a trash incinerator while also providing some great mulch for our plants. (Read about our composting efforts here and here.)

4) Appliances. Our most recent appliance purchases have been Energy Star Certified or more environmentally friendly. We bought our new washer and dryer earlier this year to replace our energy-hogging 8 year old models. During our whole house renovation we bought an Energy Star rated refrigerator and Bosch dishwasher. We also installed a second tank-less hot water heater, and a second high-efficiency furnace.


5) Insulation. When we redid the house we added foam insulation in the attic and a lot of insulation in the walls in the basement, first and second stories. I think this has made a huge difference in our energy consumption. In fact, our gas and electric bills are only a few dollars more per month than they were before our renovation - and that includes the extra 1800 square feet!

6) Reduce waste. Overall, we try to reduce the amount of waste we create. We use our fridge filter instead of bottled water whenever possible. I use a permanent coffee filter. We rarely use paper cups and plates except for very large parties. We don't use paper towels in the bathrooms. We still use paper napkins and paper towels, but hopefully when the kids are a little older (and maybe less messy?), we'll be able to reduce our paper napkin use. We sell, give away, or donate things that we are no longer using instead of putting them out with the trash.

What are you doing to reduce your environmental impact on the Earth? Any easy tips to share with others?
______________________________
p.s. The HOUSEography Room-by-Room House Tour continues Monday with your Home Office, Craft Room, Sewing Room, "Mom Cave", or other special nook in your home!

4.21.2011

No eye candy - Just an organized kitchen

If you are looking for eye candy, this is not your post so you may want to move on. This is about rethinking my kitchen organization and making it work better for us. Not sure if this happens to other people, but usually when I start out in a new kitchen, I put things away according to how I think it will work best for our family but often resort to where things fit the best. I then almost never rethink or reorganize once I realize thinks aren't working. I just live with it. But maybe that's because our previous kitchens were so small they didn't allow for flexibility.


We've been using this kitchen for over 18 months now and things were bothering me. So, I'm taking a new tact and making changes to my organization. This probably means I am going to open the wrong cabinet or drawer for a month but so be it.

First, I tackled the corner cabinet lazy susan where our spices reside (and still do - more on that in a later post), as well as our various storage containers.  Every time I had to find a container, they would fall over or the lid was MIA. So annoying. We use a lot of these containers for left-overs and cut-up fruit. Here's how that shelf looked before. Not pretty.

Of course, this was the reason that I wanted a lot of drawers in my kitchen in the first place. Crawling around on the floor to find a tiny lid is not my idea of fun. So,the best solution was to move this pile of stuff to a drawer. This required clearing space in a full drawer for this stuff. I then moved casserole dishes onto the lazy susan which are perfect here because I can stack them up without issue and there are no small parts to fall off the back of the shelf.
 Here's the pile of homeless plastic containers.
I then moved some seldom used baking stuff to the cabinet next to the stove where the casserole dishes previously lived. Still easily accessible, but remember - I don't bake. I use the glass rectangular Pyrex dishes all the time though so this worked fine.


And here's where the plastic storage containers ended up -

As a side note, I like the RubberMaid type because they are BPA free and the lids snap together. I have four different sizes of containers but all of them take only 2 lids so I don't have the problem of digging around for the right size lid from a pile 10 different sizes. Admittedly, it costs more to buy the pieces individually than in the bigger set but I also get only the pieces that I am going to use.

So, overall, I think everything ended up in easily accessible places, but when I open that bottom drawer to grab a container, I feel soooo much better!

Any kitchen organization projects going on?

4.19.2011

Easter Mantel

With less than a week to go before Easter, I finally got around to throwing some Easter decorations onto the mantel. I've had all of this stuff for a few years with the exception of the milk glass pieces which I have picked up at thrift stores over the past few weeks for less than $2 each, and the fresh tulips of course.


Tulips are one of my favorite flowers. I love them in this white pitcher which previously held my kitchen utensils next to my stove. So much better with tulips than wooden spoons.

Happy Easter!
________________________________________
Check out this week's room-by-room house tour party: Dining Rooms!

4.18.2011

House Tour Room-by-Room Link-up Party: Dining Rooms!

Thanks to everyone who linked up their family room posts last week! Your rooms are amazing and it makes me realize how many talented people there are out there and how many more awesome blogs that I was not reading before but now am. That party is open for a few more hours if you still want to post. And, here's the full room-by-room schedule in case you like to plan ahead.

So, the house tour continues with dining rooms. I spent a lot of timing working on my dining room last year, starting with a new rug and all new artwork. For some reason, artwork in a dining room seems more important to me - maybe because if you are actually sitting and eating you might look at what's hanging on the wall. Maybe that's just me.

We really don't use this room very much but I love it when we do eat in there. This was our main eating area before our renovation so we spent a lot of time in here. We only have four chairs at our kitchen table and that is intentional. This way, if we have anyone over we have to eat in the dining room and I love that. When it's not being used as a dining room, I often use it as our home office. I have considered buying a piece of furniture to house all of our home office type equipment but I have refrained (shocking!).

 
Here's how it looked when we first toured the house 9 years ago (we sat at the dining room table to write the offer). We actually kept the wallpaper for 4 years or so before stripping it and repainting both the living room and dining room which are connected through a large open archway. It's hard to tell here but there was wall-to-wall carpet in the entire house.


Pre-renovation:


 Post-renovation:
 Today:


Read more about our dining room evolution here, here, and here.

Several seasonal centerpieces:


Decorated for my friend Kim's baby shower:

Now, it's your turn! Please link-up any blog post about your dining room or another eating area in your house. The post does not need to be new but just needs to feature that room in some way (new table, art, rug, etc.).


Please include my House Tour Party button or a link to my blog in your post or somewhere on your blog! And, please feel free to spread the news on Twitter and Facebook so we can build a great library of decorating ideas!

HOUSEography House Tour Link Party


______________________________________________
Find us on Facebook or Twitter!

Linking to Cottage and Vine Dining Room Party

p.s. Today is my birthday!